Sunday, April 7, 2019

Iron Throne Cake


Helloooooo! It has been a while since any of us posted, but this one was too good not to share. My cousin (and fellow GoT fan) celebrated her birthday a couple of days ago, and I made her a cake that was fit for any ruler of Westeros. I didn't take any pictures of the process because I was so afraid of messing up the whole time, BUT I will explain what I did so y'all can try it out.

Supplies for Iron Throne: 


  • Styrofoam
  • Polymer clay
  • Hot glue gun
  • Hot glue sticks
  • 100 plastic appetizer swords (I got mine from Party City...color doesn't matter because they will be painted)
  • Wire cutters
  • Black spray paint
  • Metallic silver paint
  • Metallic gold paint (optional)
Supplies for Cake:
  • 2 boxes cake mix (I used yellow and red velvet cake)
  • 2 containers frosting (chocolate/ cream cheese)
  • White chocolate melts
  • Black food color
  • Edible glitter (optional)
Directions:
First I cut the styrofoam into a curved back, two rectangle sides, and two squares (stacked on top of each other for the seat) and glued them all together. Next I rolled out the clay into a thin sheet and cut into ~1/4 in wide strips with pointed ends. Lay these strips over the base of the throne where you need curved "swords." I then preheated the oven to 200 degrees and then turned it OFF before placing the seat in the oven. [I made a mini throne to use as a guinea pig before working with the actual throne and the styrofoam partially melted in the oven, so make sure it is off but still warm.] I left it in the oven for about 10-15 minutes and then let it cool before beginning the next step.

Next, you will use the wire cutters to trip the hilts off of the swords. This process is fairly tedious but it will make the throne look more authentic in the end! I also trimmed the entire handle off of the swords that stick straight up from the top of the throne. I punched a hole in the styrofoam with the swords, filled the whole with hot glue, and placed the swords back into the holes. I had 3 layers of swords at the top with the middle layer being the tallest. For the rest of the swords you have to use some imagination in filling all the gaps, but remember the actual throne isn't perfect so you can basically put swords anywhere. I started from the top and glued the swords facing downwards for the front and back. To fill gaps, you can use handles that were trimmed for the swords on top. You will also need to trim swords to fit certain areas. THIS WILL TAKE A WHILE. 

Once all the swords are glued on, you need to spray paint the entire throne black and let dry. Once that is done, dry brush the metallic paint onto the swords (just use a TINY bit of paint at a time). This will give the swords an antique iron look. I also used a very small amount of gold paint on the handles of the swords to make them look worn. And VOILA!

For the cake, just prepare according to the box directions. I used red velvet cake with cream cheese frosting for the bottom and yellow cake with chocolate frosting for the top. The bottom cake is one layer and the top is two layers. For the frosting, I just frosted both cakes without dying the frosting at first. I had an incident a couple years ago where I tried to dye frosting black and added TOO much black dye and it stained my friends' mouths black (sorry Clint!), so this time I purchased a black sprayable food dye (from Michaels) which worked perfectly! For the bottom I did an ombre by piping frosting in a single line around the cake, adding a little bit of dye, piping again, and repeat. I then smoothed it out with a bench scraper before piping the text onto the side. I also piped some black frosting around the base of the top layer and added edible glitter on top. 

For the stark logos, I printed them out 2" high and covered the paper with parchment paper. Then I melted the white chocolate, put in a piping bag with a size 1 tip, and traced the pattern. I put these in the freezer for about 5 minutes before placing them on the sides. 

*NOTE: be carefull when lighting the candles because one of them caught a sword on fire and the bottom ones started melting the chocolate sigils!!*

Here was the end result! 

The new season of GoT is a week from today!! Let us know how you all are celebrating in the comments! Valar Morghulis!

Lauren

Thursday, March 10, 2016

Mason Jar Craft

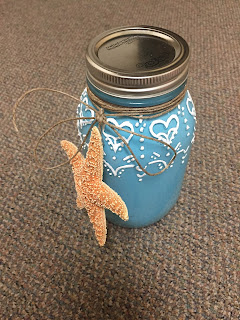
Hello! This is a very special post, because it is courtesy of my roommate! Liz was doing some crafting for her little during Big-Little week, and this was my personal favorite of her creations.


Supplies:

  • Mason Jar
  • Paint brush (she used a foam one)
  • Acrylic Paint
  • Puffy Paint
  • Twine
  • Accessory of your choice

Assembly:

  1. Paint Jar:   This will require a couple of coats in order to get a nice uniform color on the outside. Allow each coat to completely dry before adding another. 
  2. Decorate: Let your imagination run wild by using puffy paint to decorate the outside. This will require a steady hand and a lot of patience!
  3. Accessorize: Personalize your jar by attaching an accessory of your choice. Liz's little liked the beach, so she bought a fake starfish from Michael's. You can wrap twine around the top of the jar and then use hot glue to attach the twine to your accessory.
And there you have it! A simple and chic decoration or gift! Liz also filled it with her little's favorite candy when she was finished! 

Bisous!

Lauren

Monday, September 14, 2015

Thrift Shop Make-over!

Mirror Coat Rack


Hi everyone!

Recently I have been doing a lot of crafting for my new apartment, and I thought I would share this beauty with you! I went shopping at Goodwill to see if they had anything that could use a good makeover, and stumbled across this cool coat rack with a mirror. The decor for my apartment is black, white, and gold, so I used that color scheme for this project! This is a really specific tutorial, but the concept can be used to give endless items a good makeover!

Steps:

1. Remove hardware. 


This must be done so you can sand/ paint smooth lines, instead of trying to paint around them.

2. Sand 

I sanded down the entire frame mainly to remove the existing paint. That way there wouldn't be any awkward star shaped bumps when I went to paint. As I sanded, I used a brush to remove dust from the crevices. The third photo shows the frame once I was done sanding.

3. Paint- main colors


Now to the fun part! I started painting with white since it was the lighter color and would therefore be easy to correct with the black if I went over the lines. I was lucky with this frame because there were already lines in the wood! I ended up doing two coats using a foam brush (first pic shows difference between 1st and 2nd coats), and then smoothed that off using a soft bristle brush (second pic). When that was finished, I started the black by using a very fine bristle brush to make sure my lines were perfectly straight. I then used the foam brush to get the rest of it on there. I painted the outer sides black too.

4. Paint- accent color


Next, I used a small bristle brush to apply the gold paint. I ended up doing three coats of this color to make sure the boarder popped!

5. Paint hardware


For the hooks, I used Rustoleum's Metallic Gold spray paint. This has with out a doubt become my favorite paint, and I have spray painted almost all of my other decorations with this color. I flipped a box upside down so that I could stick the screws in to paint them. I just did one coat and they turned out perfect! Once they were dry, I screwed them back onto the frame.

And voila! A simple and cheap home decoration! I hope you all enjoyed this tutorial! Please feel free to comment any of your own Thrift Shop Makeovers!

Bisous,

Lauren
Monday, August 31, 2015

DIY Wall Tapestry


Hey ya'll! so I spent a bunch of time trying to come up with ideas to make wall tapestries for my dorm room because I don't really want to pay 30+ bucks for one. I tried a few different techniques, including a glue/dye job which if you would like to know more about, leave a comment at the end of this post! Today I am going to talk to you about the first of two different techniques that I used.

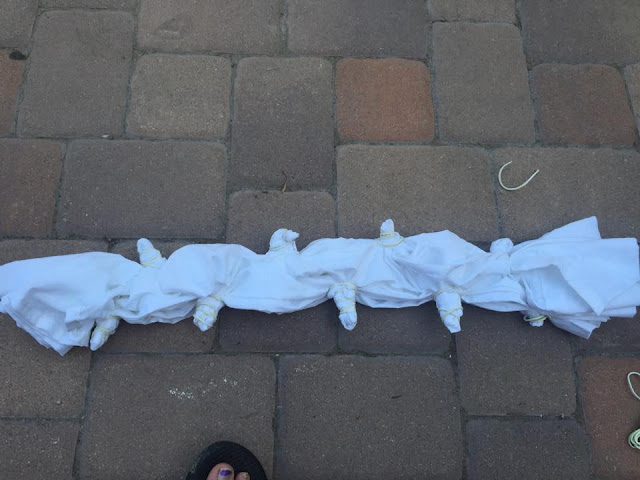
ALSO I'm sorry for the awful quality of the picture above, my room has horrible lighting and i promise it looks SO much better in person!

First I bought a twin flat sheet at Walmart. I think it was about 5 bucks which was fantastic.
I folded that sheet in half and pinned it down in order to cut it. There are a bunch of ways to cut it in half, i just figured this method would give me the straightest edge.

Then, I sewed each of the edge to make a hem line so the tapestries wouldn't fray on the edges. If you haven't mastered the art of sewing, you can buy some stitch witchery at your local craft store and use that to close the edges. 


The first is the technique that is a spin off of shibori dye jobs. Shibori typically uses indigo dye in order to make beautiful designs with that rich, dark color. I however bought a tie dye kit and used the purple color along with the left over teal from the second tapestry that I made.


  • One twin sized flat sheet
  • scissors
  • sewing machine (or stitch witchery)
  • rubber bands
  • dye (however many colors you want to do) 
    • if you use the dye from the other project I did, see how to make it here
  • plastic gloves

Once you have your sheet cut into two, you can start folding!
Start by folding the sheet like an accordion, starting from any side that you want. I went up and down rather than side to side.


Next, start bunching up the sides in equal distances and wrapping rubber bands around them.
After this, you can choose to fold the entire thing in half and rubber band it together, or dye it as is.
Once the rubber banding was finished, I laid the entire thing out on my lawn and put the dyes in the squirt bottles and began applying the dye. Don't forget to put gloves on.

I let this sit for 6 hours to soak in the dye and then cut off the rubber bands. Once you cut off the rubber bands, rinse in the sink until the water runs clear. When you are done rinsing, hang it to dry.

Again, this picture does not do the finished product justice.

enjoy!
xoxox Rachel


Wednesday, July 8, 2015

DIY Dip Dye Tank


What you will need:

    • Shirt (washed and dried)
    • Iron on letters (optional)
    • 2 Tbsp salt
    • 2 Tbsp laundry soap
    • Rubber gloves
    • Metal or glass bowl that can hold a gallon of water
    • 1 gallon of water  (16 cups)
    • powder dye
    • hanger
    • spoon

First:

Heat one gallon of water until boiling. Empty dye packet into bowl and mix with the salt.


Next

Pour boiling water over powder and salt and mix thoroughly. Add laundry soap, but don't stir too much to keep it from bubbling.


Then

Wet shirt in the area you want died. I recommend about 3/4. Put the shirt on  the hanger.


Yes, gloves are necessary especially for when you rinse at the end or your hands will be dyed for the rest of the day.

Dye Time

  Dip shirt into dye until the desired dye line is met. 


Next dips should stay for 30 seconds, 2 minutes, 5 minutes and 10 minutes.

Tshirt photo originally from blog.spoongraphics.co.uk ( I forgot to take a blank picture)


Then:

Remove from dye and rinse thoroughly until water runs clear. Carefully rub your gloves along the top of the dye line to try to blend it out.


Let hang to dry and then wash in washer with cold water by itself.

If you chose to add iron ons, do so now and then you are done!


- Good luck!
XoXo 
Rachel

Saturday, May 23, 2015

20 Things that I Learned my Freshman Year


Freshman year is full of new things from going to a new school to learning how to adapt to college life. Iv'e learned so much this year but there were many things I wish I would have known going into school. It can be really scary, but freshman year can also be one of the best years of your life.


1. Watch your popcorn

I can't tell you how many times I had to stand outside in the middle of the night, morning and all other times of the day because someone burnt their popcorn. Fire alarms are super sensitive and when they are set off everyone has to evacuate. I set off the alarm once and it was super embarrassing, don't let that be you.


2.  Be open to meeting new people.

Starting college is hard because you hardly know anyone. Take advantage of every opportunity you get to go out and meet people. Everyone is looking for friends, don't be worried about people not liking you. Just put yourself out there.


3.  Try to remember peoples names

You're going to be meeting so many new people your first month or so. If you're good at remembering names, that's great. If you aren't, thats okay too. It's always super awkward when you know you've met someone but can't remember their name but the truth is, at this point they probably don't remember yours either.  So just ask and get the awkwardness out of the way, it's better than never knowing and eventually having it be too late to ask again.


4. Go to class

Even if you have those professors that don't care if you come to class, or if you're in a giant lecture hall, going to class is a must. Professors often discuss material or make important remarks that can't be found in your textbooks. In a smaller classroom setting, professors know if you aren't present and won't think as highly of you if you aren't there.


5. Do extra credit

I'm not sure how grading works at most schools, but at mine the difference between a B+ and a B are huge. A plus is worth roughly .33% more than just a flat letter grade. Extra credit makes all the difference and will show your professor you're really trying.


6. Don't buy your books from the bookstore.

Your campus bookstore jacks up the prices of the textbooks. I saved over $100 each semester buying my books off of amazon. I also recommend buying and not selling your books. Buying is so much easier because you don't have to worry about something happening to them or returning them at the end of the semester, plus it's a nice incentive at the end of the semester when you can sell them back and magically get easy cash.


7. Do SOMETHING

No matter what it is, get involved with something. Whether it's greek life, a club or a sport, do something. You're college experience will be so much better if you're involved. Activities also introduce you to people and can help you adjust to the college atmosphere.


8. Watch out for your friends.

A great thing about my school is that we all watch out and take care of each other when we go out. Parties are great but it's still important to watch your drinks and to make sure your friends aren't leaving with a sketchy guy.


8. Take care of people

If a friend is sick, take care of them. You never know when the situation will be switched and you'll want someone taking care of you. Check out this website from the University of Texas for more information about alcohol poisoning. Don't be afraid to call 911 and get your friend in trouble. Many schools have a policy for helping students with no repercussions.


9. Form study groups

Study groups are a great way to go over material. Teaching things you know to others is one of the best ways to remember information. It's also a great way to go over material you don't know.


10. Get away from your high school self

No one cares anymore if you were a super great football player or were the best in your class. People who can't stop reliving their high school days are hard to be around. Don't forget those memories, but constantly bringing high school up to your new friends is annoying. Don't be that person.


11. Avoid sickness at all costs

Staying healthy in college is super hard. You're confined to small areas with people and constantly interacting with everyone. Pump yourself up on vitamin C and use some hand sanitizer.


12.  Call your family

They miss you A LOT. Go ahead and give them a call and tell them how you're doing.


13. It's okay to not know what you're doing with your life

If you haven't decided on a major, THAT'S OKAY. Freshman year is the time to take different classes and figure it out. It's also okay if you don't know by the end. You'll get there and find something you love.


14. Bring enough socks and underwear

Let's face it, you're not going to want to do laundry every week. Hell, I hate doing it. Think about how often you want to do laundry and bring enough socks and underwear to last you however long. This will save you in the long run.


15. Be a good roommate

If your roommate is still sleeping, don't turn on the light when you get up. Stumble around awkwardly with your phone for a flashlight and get dressed.  Use headphones when listening to anything. If you're staying up late and she is going to bed, go somewhere else. Happy roommates make your life easier.


16.  Don't get into a relationship right away

Getting into a relationship as soon as you get there limits you socially. You won't go out as often and you won't be as open to meet new people.  Let yourself meet every guy you can, my guy friends are some of the best people that I know.


17. Long distance doesn't always work and that's okay

Out of all my friends who went into college with a long distance significant other, I think maybe one or two of them are still together. College changes you and it's hard maintaining that connection so far away. IT WILL BE OKAY.  Being long distance means that most of the people you know won't know your ex and you won't be surrounded by things that constantly remind you of them. You are going to meet so many new people and find someone else.


18. Go to sporting events

Supporting your school and hanging out with friends is so much fun! Just do it. You won't regret it. 


19. Don't wear your lanyard 

You are going to be so tempted to wear your lanyard with your ID around campus because it's convenient. Don't do it. It is a huge flag to everyone saying "Hey I'm a freshman." 


20.  Have fun

Freshman year is the year where you're expected to have fun. You will have the least responsibilities this year out of all four years there. Take advantage of it.


 -Love always, 

Rachel